FAQ`s | Frequently Asked Questions
...about our Light Weight Deflectometer
We have compiled the most frequently asked questions for you here, so that you can find a quick solution to your problem. If you cannot find an answer to your question here, please call us so that we can help you.
How to contact us:
Phone: +49 (0) 3931 / 25 27 3-20
eMail: sales@zorn-instruments.de
Calibration
As German test regulations require an annual calibration, your Light Weight Deflectometer is approved for official use no longer than one year! For a calibration appointment, please note the serial number in advance and contact us by phone or email.
Calibrations are possible at our ZORN headquarters in Stendal as well as at our service partners abroad.
What exactly is done during a calibration? You can see that in this video.
When was the last calibration?
ZFG 02 | ZFG 2000 (LWD 02, LWD 2000)

The date of the last calibration is on the blue calibration plate on the Light Weight Deflectometer (month and year) and in the calibration record. On the red sticker on the load plate, you will find the date for the next calibration.
ZFG 3000 | ZFG 3.1 | ZFG 3.0 (LWD 3000 | LWD 3.1 | LWD 3.0)

If a calibration is due, "Calibration expired" appears on the display when the device is switched on.
You can also find the calibration information in the device menu under "Info" (switch on the device, press the Mode button until "Info" appears, press the OK button).
The date of the last calibration is on the blue calibration plate on the Light Weight Deflectometer (month and year) and in the calibration record. On the red sticker on the load plate, you will find the date for the next calibration.
Other manufacturers
In the case of devices from other manufacturers, the information about the last calibration is usually on a sticker on the unit (either the drop plate or drop weight) or there is information on the electronic measuring device. In either case, the date is still noted in the calibration record. If you have any questions, we will be happy to help you (see contact above).
Costs
A Light Weight Deflectometer is calibrated within a few days at our premises in Stendal or at one of our service partners. We can arrange for the equipment to be collected from you (by freight forwarder, courier) or you send it to us directly.
Calibration costs are as follows:
• a light drop weight device from ZORN costs 215 Euro
• a light drop weight device from a third party manufacturer costs 245 Euro
• an RSV calibration (Austria) costs 450 Euro
For a calibration appointment, please note the serial number in advance and contact us by phone or email.
Serial number
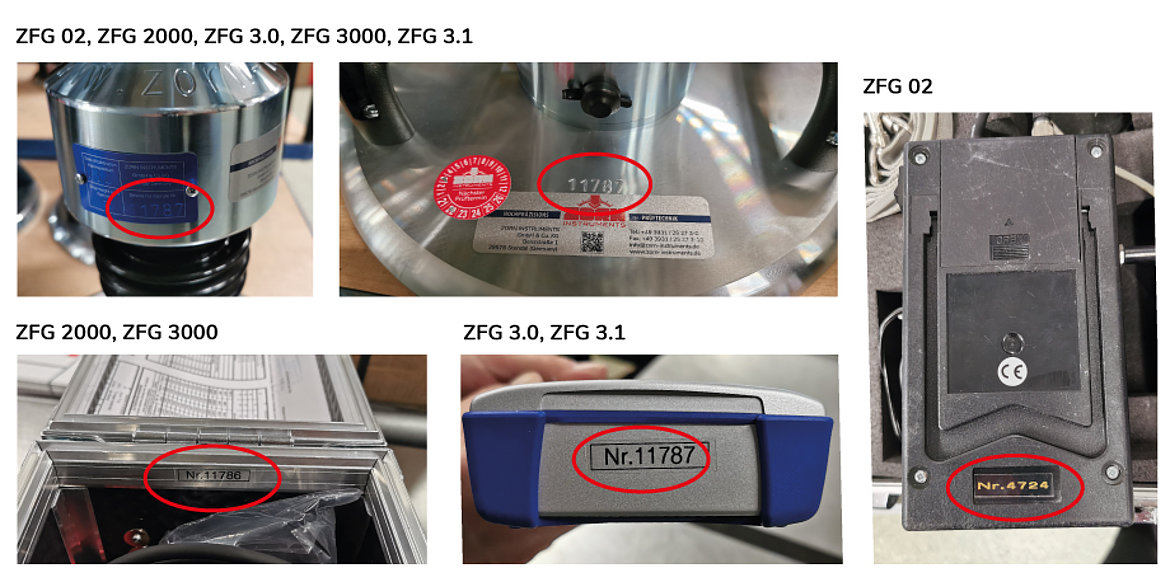
There are various markings on the drop weight and the electronics box that show the serial number of the unit (see photos). This can also be found in the calibration record. The attachment is similar for third-party devices.
Electronics Box
...cannot be switched on
ZFG 02 (LWD 02)
First check whether the four R6 (AA) NiMH batteries are discharged. Please charge the unit for a period of twelve hours or insert four new NiMH batteries.
If the unit still does not switch on, the toggle switch on the right side may be defective. The complete ZFG must be sent in for repair.
If the unit can be switched on via the toggle switch but does not react when the button in the middle of the electronics is pressed (the button starts the measurement), then this button is defective. The complete ZFG must be sent in for repair.
ZFG 2000 (LWD 2000)
The built-in battery is probably discharged. Please charge the device with the accompanying power supply unit. The display immediately shows: "Battery Charging". The charging bar below indicates the end of the charging process.
ZFG 3.0 | ZFG 3.1 (LWD 3.0 | LWD 3.1)
The batteries are probably discharged. This type of device is operated with four R6 (AA) batteries. You can replace them after opening the battery compartment. Make sure that the chambers are free of salts and leakage.
ZFG 3000 (LWD 3000)
The battery of the ZFG 3000 is probably discharged. Please only connect the charger belonging to this measuring device to charge the batteries. The charge bar in the display shows the charge status of the battery.
...black display
Was the device exposed to extreme heat or very strong sunlight? Then the surface temperature of the device is too high. Store the unit in a cool place and try again later.
…incorrect user language
ZFG 02 (LWD 02)
The language is fixed for the ZFG 02 and cannot be changed by the user.
ZFG 2000 (LWD 2000)
You can easily save your user language in the unit as the default. To do this, switch on the unit with the Start button and press the Mode button until your language appears in the display. Then press the Start button to confirm.
ZFG 3000 | ZFG 3.0 | ZFG 3.1 (LWD 3000 | LWD 3.0 | LWD 3.1)
You can automatically reset the language to English. With the unit switched off, press and hold the "+" key and switch the unit on again. The menu navigation in English appears in the display!
Now press the Mode button five times until "Settings" appears, then press the OK button to enter the submenu. Press the OK button again until your language is displayed. Press the ON/OFF button to save the selected language as the default language for the device.
… shows no measurement | shows "Repeat measurement burst“
First steps for all devices
If the device’s display does not react to the impact/fall of the drop weight, despite the device being switched on and after you have already started the measuring process by pressing the OK button, then this can have several causes:
- Please check that the loading device is on the load plate and not mistakenly still on the magnetic stand foot.
- Check the device connection with the sensor on the load plate (measuring cable). Both plugs should be in the sockets as far as they will go. Check whether a measurement is now possible.
- The condition of the soil can also be the cause of the problem:
- Base soil too soft (soil too soft, s > 12 mm) or too hard (soil too hard, s < 0.1 mm)
- If necessary, to exclude this as a cause, find a place where a meaningful measurement can be expected and repeat the measurement
If there is still no settlement value displayed, the cable connection between the load plate and the device should be checked using the device's menu setting:
ZFG 02 (LDW 02)
With the ZFG 02, you can enter the calibration programme by switching on the device while holding down the START button. The value "a" is between 50 and 58. Raising and turning the load plate (rotating the plate by 180°, ball downwards) allows "a" to fluctuate between these two values.
If the value "a" does not change, the sensor is defective. The complete ZFG must be sent in for repair.
If this value deviates greatly, e.g. a = 54, then there is a possible cable fault or a contact problem.
If the cable is moved back and forth on the plug and a change in the value "a" is observed, there is a cable fault or the plug or socket is defective. The complete ZFG must be sent in for repair.
If the deviation remains, the sensor is defective and the complete ZFG must be sent in for repair.
ZFG 2000 (LDW 2000)
With the ZFG 2000, you can access the menu item "Calibration" after switching on the unit by pressing the Mode button several times. Press the Start button to see the calibration values. The value "a" is between 47 and 51. Raising and turning the load plate (rotating the plate by 180°, ball downwards) will cause "a" to fluctuate between these two values.
If the value "a" does not change, the sensor is defective. The complete ZFG must be sent in for repair.
If this value deviates greatly, e.g. a = 50, then there is possibly a cable fault or a contact problem.
If the cable is moved back and forth on the plug and a change in the value "a" is observed, there is a cable fault or the plug or socket is defective. A new measuring cable solves the problem.
If the deviation remains, the sensor is defective and the complete ZFG must be sent in for repair.
ZFG 3000 | ZFG 3.0 | ZFG 3.1 (LWD 3000 | LWD 3.0 | LWD 3.1)
Select the programme "Calibration" with the MODE key and confirm by pressing the OK key. The display shows the value "a" indicating the signal of the accelerometer, the calibration factor "F" and the measurement type "Type".
For the unit types ZFG 3000, ZFG 3.1, ZFG 3.0, the value "a" is between +2 and -2. Raising and turning the load plate (rotating the plate by 180°, ball downwards) allows "a" to fluctuate between these two values.
If the value "a" does not change, the sensor is defective. The complete ZFG must be sent in for repair.
If this value deviates greatly, e.g. a = -124, then there is possibly a cable fault or a contact problem.
If the cable is moved back and forth on the plug and a change in the value "a" is observed, there is a cable fault or the plug or socket is defective. A new measuring cable solves the problem.
If the deviation remains, the sensor is defective and the complete ZFG must be sent in for repair.
…shows incorrect time | incorrect date
ZFG 02 (LWD 02)
Switch on the device. While holding down the start button, move the toggle switch next to the measuring cable to the left position. You move the cursor back and forth between the time and date digits with the changeover switch, and with the Start button you change the numbers (counts up one number per click). Please switch off the unit and bring the changeover switch back to the right position.
ZFG 2000 (LWD 2000)
Switch on the device and cycle with the MODE button to the menu item "Set clock". Press the OK button. Use the MODE key to move the cursor back and forth between the time and date digits. Press the OK button to change the information, then save by pressing the Off button.
ZFG 3000 | ZFG 3.0 | ZFG 3.1 (LWD 3000 | LWD 3.0 | LWD 3.1)
Switch on the device and cycle with the MODE button until "Set clock" is displayed. Press the OK button. A line (cursor) appears under the time and date digits, which can be moved with the MODE button. Use the +/- keys to set the correct time, which must then be saved by pressing the OFF key.
…GPS-Signal?
...switching the GPS on and off
If your device has GPS, you can set it as follows: Switch on the unit. Press the Mode button to enter the menu. Scroll with the Mode button to the subitem "Settings", press the OK button, scroll again with the Mode button to the subitem "GPS: ON" or "GPS: OFF". Select the desired option ("on" or "off") with the + and - keys and save your selection with the ON/OFF key.
...no signal
After switching on the unit, no GPS coordinates appear in the display. GPS: 0 flashes above the charge status display. Depending on cloud density and the surrounding buildings, reception of the GPS signal may be delayed by up to 15 minutes. This signal cannot normally be received in tunnels, under subways or in closed rooms.
Printer
The ZORN light drop-weight units are equipped with different printers depending on the series:
- ZFG 02 dot matrix printer, newer units from 2002 also with thermal printer
- ZFG 2000 built-in dot matrix printer
- ZFG 3.1, 3.0 thermal printer
- ZFG 3000 built-in thermal printer
...doesn’t print
ZFG 02 (LWD 02)
First check that there is enough printer paper and that the ink ribbon has not dried out. If necessary, add printer paper and replace the ink cassette.
After the measurement, the printer is started with the START button. If the print function does not work, the printer cable is most likely interrupted. A defective printer can also be the cause. In either case, the device must be sent in for repair.
If your printer is one of the newer generations in the model range, then it may be due to the paper type. If the printer works but nothing is visible on the printer paper, then there is no thermal paper in the printer (thumbnail test).
ZFG 2000 (LWD 2000)
First check that there is enough printer paper and that the ink ribbon has not dried out. If necessary, add printer paper and replace the ink cassette.
After the measurement, the printer is started with the START button. If the print function does not work, the printer is most likely defective. The device must be sent in for repair.
ZFG 3000 (LWD 3000)
If, in the case of the ZFG 3000, the "PRINT" key is activated, the printer is working but nothing can be seen on the printer paper, then there is no thermal printing paper in the printer (thumbnail test).
If the print function fails, the printer is most likely defective. The device must be sent in for repair.
ZFG 3.0 | ZFG 3.1 (LWD 3.0 | LWD 3.0)
The devices are equipped with a separate thermal printer with built-in battery. Please check first whether the printer cable is connected to the device.
Logs can be printed out by pressing the print key. If after activating the printer, the printer is working but nothing can be seen on the printer paper, then there is no thermal paper in the printer (thumbnail test).
With this type of device, the printer battery must be charged separately using the charger supplied. A charging bar in the display of the measuring device provides information about the current charging status of the printer battery. If the printer does not respond to the print command even though the battery is fully charged, there may be a fault in the connection cable or the printer itself may be defective. The device must be sent in for repair.
…prints undefinable characters
ZFG 02 (LWD 02)
The connection cable or the printer is defective. Please send the printer together with the settlement device for repair.
ZFG 3.0 (LWD 3.0)
You can solve the problem by resetting the printer to the factory settings. Proceed as follows: press and hold the OFF/NEXT key and the FEED/ENTER key simultaneously for about three seconds, then press the OFF/NEXT key once, then the FEED/ENTER key and finally press the OFF/NEXT key and the FEED/ENTER key again simultaneously for about three seconds.
Measuring process
…no measurement possible | "Repeat measurement burst"
First steps for all devices
If the display of the measuring device does not react to the impact/fall of the drop weight, despite the device being switched on and after you have already started the measuring process by pressing the OK button, then this can have several causes:
- Please check that the loading device is on the load plate and not mistakenly still on the magnetic stand foot.
- Check the device’s connection with the sensor on the load plate (measuring cable). Both plugs should be in the sockets as far as they will go. Check whether a measurement is now possible.
- The condition of the soil can also be the cause of the problem:
- Base soil too soft (soil too soft, s > 12 mm) or too hard (soil too hard, s < 0.1 mm)
- If necessary, to exclude this as a cause, find a place where a meaningful measurement can be expected and repeat the measurement.
If there is still no settlement value displayed, the cable connection between the load plate and the device should be checked using the device's menu setting:
ZFG 02 (LWD 02)
With the ZFG 02, you can enter the calibration programme by switching on the device while holding down the START button. The value "a" is between 50 and 58. Raising and turning the load plate (rotating the plate by 180°, ball downwards) allows "a" to fluctuate between these two values.
If the value "a" does not change, the sensor is defective. The complete ZFG must be sent in for repair.
If this value deviates greatly, e.g. a = 54, then there is possibly a cable fault or a contact problem.
If the cable is moved back and forth on the plug and a change in the value "a" is observed, there is a cable fault or the plug or socket is defective. The complete ZFG must be sent in for repair.
If the deviation remains, the sensor is defective and the complete ZFG must be sent in for repair.
ZFG 2000 (LWD 2000)
With the ZFG 2000, you can access the menu item "Calibration" after switching on the unit by pressing the Mode button several times. Press the Start button to see the calibration values. The value "a" is between 47 and 51. Raising and turning the load plate (rotating the plate by 180°, ball downwards) will cause "a" to fluctuate between these two values.
If the value "a" does not change, the sensor is defective. The complete ZFG must be sent in for repair.
If this value deviates greatly, e.g. a = 50, then there is possibly a cable fault or a contact problem.
If the cable is moved back and forth on the plug and a change in the value "a" is observed, there is a cable fault or the plug or socket is defective. A new measuring cable solves the problem.
If the deviation remains, the sensor is defective and the complete ZFG must be sent in for repair.
ZFG 3000 | ZFG 3.0 | ZFG 3.1 (LWD 3000 | LWD 3.0 | LWD 3.1)
Select the programme "Calibration" with the MODE key and confirm by pressing the OK key. The display shows the value "a" indicating the signal of the accelerometer, the calibration factor "F" and the measurement type "Type".
For the unit types ZFG 3000, ZFG 3.1, ZFG 3.0, the value "a" is between +2 and -2. Raising and turning the load plate (rotating the plate by 180°, ball downwards) allows "a" to fluctuate between these two values.
If the value "a" does not change, the sensor is defective. The complete ZFG must be sent in for repair.
If this value deviates greatly, e.g. a = -124, then there is possibly a cable fault or a contact problem.
If the cable is moved back and forth on the plug and a change in the value "a" is observed, there is a cable fault or the plug or socket is defective. A new measuring cable solves the problem.
If the deviation remains, the sensor is defective and the complete ZFG must be sent in for repair.
...measured values differ greatly from each other
If the three measuring impacts required for a measurement show outliers in the three settlements, there is most likely an operating error. Use the MODE button to access the three settlements and the settlement curves (at the end of the measurement process by pressing the Mode button or via "Read map" in the menu, which you also reach with the Mode button). If the settlement curves are not close to each other, then a load impact, which did not reach the load plate vertically, has moved it sideways and thus resulted in an incorrect measurement.
If the drop weight is pulled into the release mechanism with too much momentum, a measurement may be triggered indicating a much too small settlement. Either engage the drop weight before the beep sounds or carefully engage it after the signal with the lever pulled.
...Evd-Value fluctuates greatly
The load plate does not have full contact on coarse-grained soil (gravel with stones larger than 63 mm), and a proper measurement is not possible. Fill up the support with fine sand.
The load plate can slip on an inclined surface during an impact and result in an incorrect measurement. Place the loading device vertically on the load plate (in this case, do not follow the test specification here, which refers to the centrally positioned air bubble in the spirit level).
If the drop weight is pulled into the release mechanism with too much momentum, a measurement may be triggered indicating a much too small settlement. Either engage the drop weight before the beep sounds or carefully engage it after the signal with the lever pulled.
In the case of uneven material distribution, especially with recycled materials, strong local fluctuations in the Evd values are possible. Long transport distances as well as vibration-roller effects lead to the segregation of the incorporated mineral material and thus create "soft" and "hard" areas.
...Evd < ½ Ev2
The base layer to be tested is built up on a soft subsoil with too little layer thickness. The counterweight required for the static load plate compression test presses the subsoil so strongly that the Ev2 value is too high as a result.
The drop weight device with a measuring depth of 30 to 60 mm senses the soft ground and thus indicates a lower value.
...Evd-Value increases with each measurement
The placed material is either insufficiently or not at all compacted and is increasingly compacted by the Leight Weight Deflectometer.
...Evd-Value decreases with each measurement
The material is shaken up by the impact load and is difficult to compact (recycled building materials). Another possible cause is the water content. The material is on the wet side of the Proctor compaction curve and the water table is just below the surface.
Evaluating measurement results
Ideal measurement
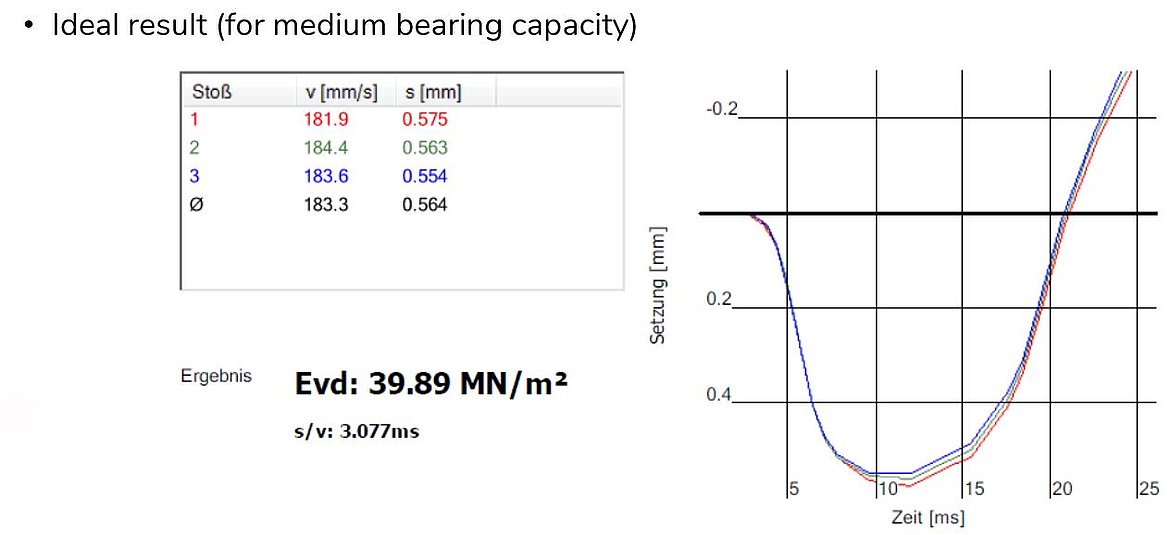
An already well compacted soil with medium bearing capacity was tested.
The settlement values for the three test impacts are close together and vary only slightly around the mean value.
However, the settlement values still decrease slightly with each impact. The ratio between mean penetration depth and velocity (s/v) is in the upper acceptable range (max. 3.5 ms).
If the reported Evd value (40 MPa) does not yet correspond to the specified target value for compaction, further compaction can be carried out
Low compaction
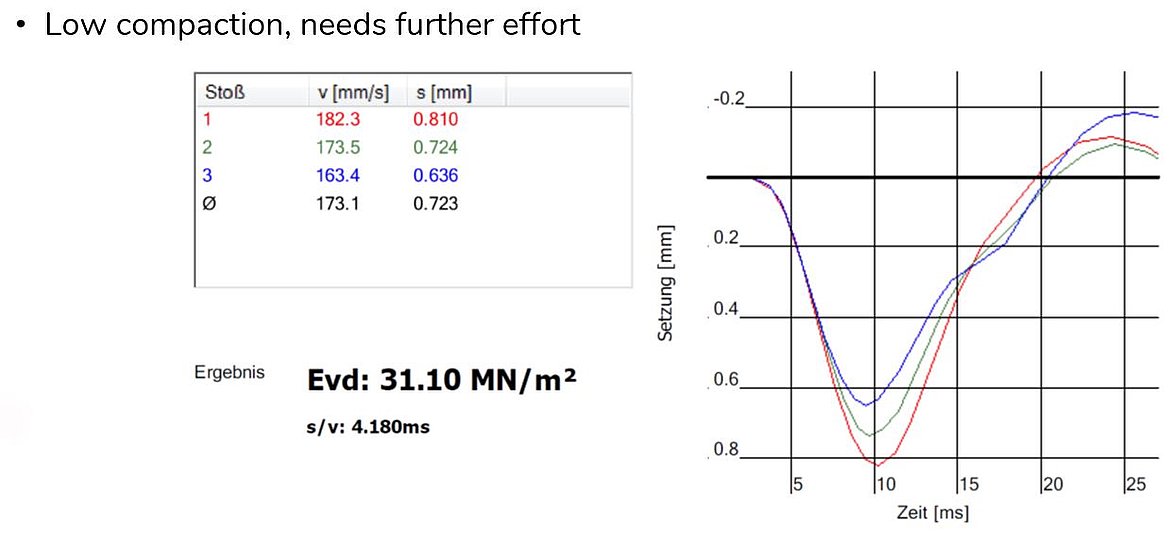
A base course with insufficient compaction was tested.
The individual settlements decrease strongly from the first impact (0.81 mm) to the third impact (0.636 mm). The first and third impacts therefore deviate strongly from the mean value.
The ratio of the mean penetration velocity to the mean settlement is too high (s/v = 4.18 ms > 3.5 ms).
As a result, a low Evd value (33 MPa) is also shown.
It must be further condensed.
If Evd value and s/v ratio do not improve despite additional compaction work, soil improvement or soil replacement measures may be necessary.
Incorrect measurement
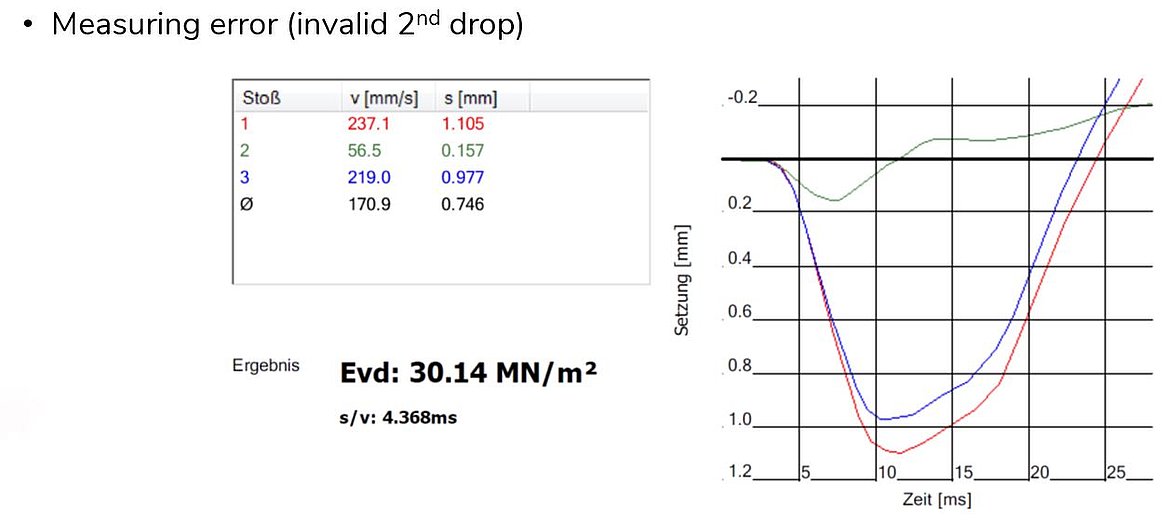
Whoops, slipped!
This measurement is invalid. The settlement value for the second impact is much too low.
The impact was actually not carried out at all. It is possible the entire LWD was lifted when the drop weight was latched after the first impact. The vibration when setting down again on the load plate was detected and thus evaluated by the sensor.
Simply move the load plate to a new measuring point and check again. It only takes two minutes!
Material too rigid
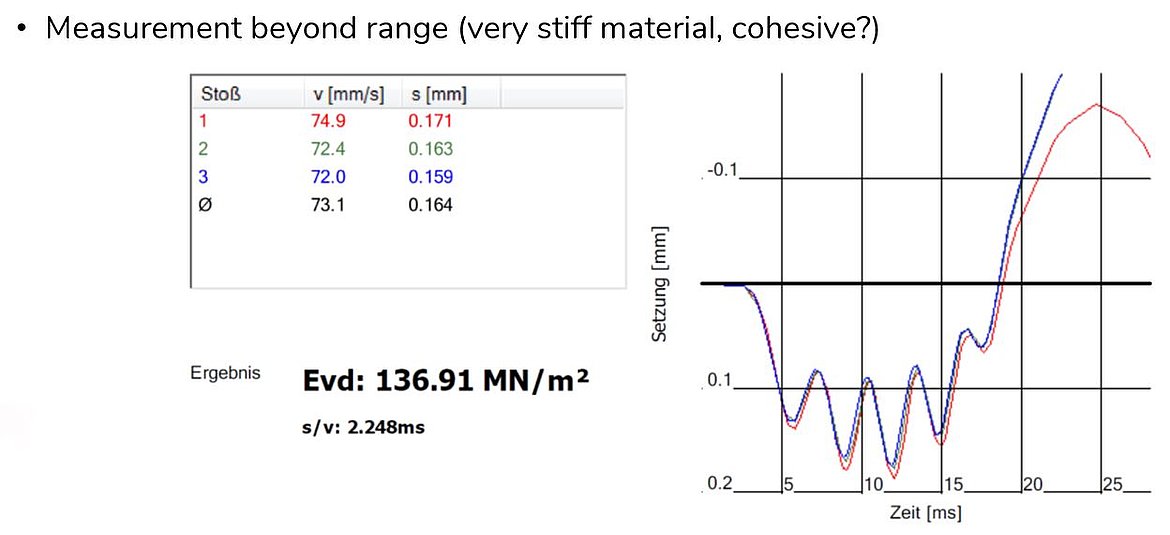
WOW! 137 MPa is a really high Evd value. Unfortunately, the measurement is invalid.
All three settlement values are well below 0.3 mm and thus outside the acceptable measuring range for which your Light Weight Deflectometer was calibrated (min. 15 - max. 70 MPa).
The settlement curves seem to fluctuate around a zero point. This curve pattern is typical for very rigid, mostly bonded materials. These react quite differently to vertical loads than non-cohesive materials, such as those typically used in earthworks for roads and railway tracks.
Contact one of our ZFG application specialists to discuss alternative compaction testing options.
The load plate slips
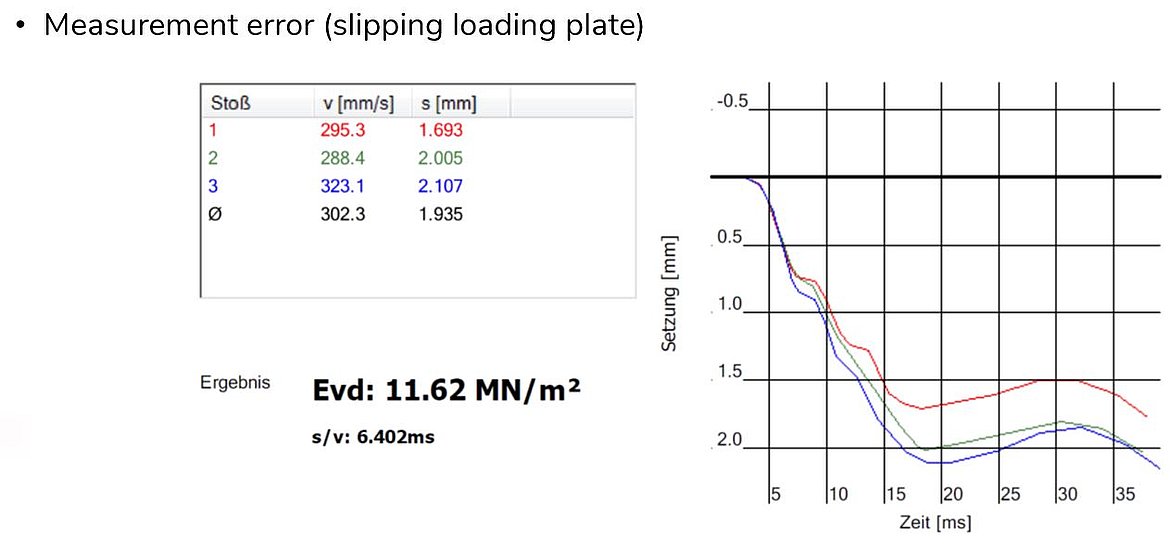
Experts know that a load plate can dance. The settlement curves show that the plate has slipped to the side during the load impacts.
Possible explanation: The supporting surface of the load plate is uneven, e.g. because the ground contains coarse particles (max. permissible size d = 63mm). As a result, the plate does not rest on the full surface and moves horizontally under load. The plate "dances".
It is worth taking a look at the test specifications (e.g. TP BF-StB Part B 8.3). According to this, a thin "layer" of dry medium sand is to be applied to compensate for unevenness, "... the sand may, however, only compensate for the unevenness under the load plate."
Now repeat the measurement.
Uncompacted soil
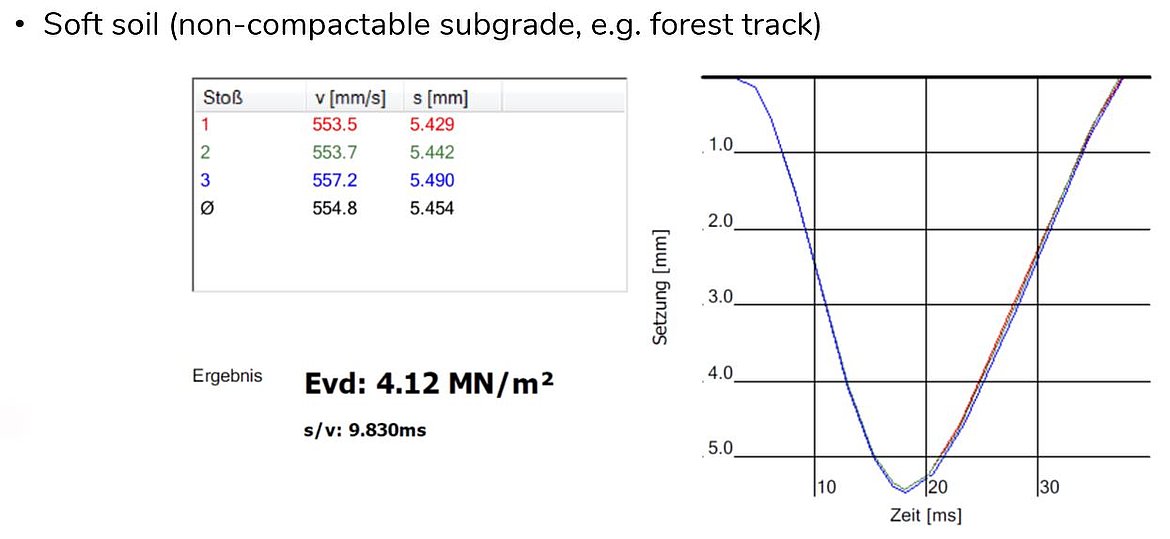
The layer tested here was not compacted or could not be compacted at all.
During the test you should have already had difficulties catching the weight after the impact as it hardly bounced back.
Such results are atypical for compacted soils and are not to be expected but are sometimes encountered when testing on standing soil.
High water content or groundwater level
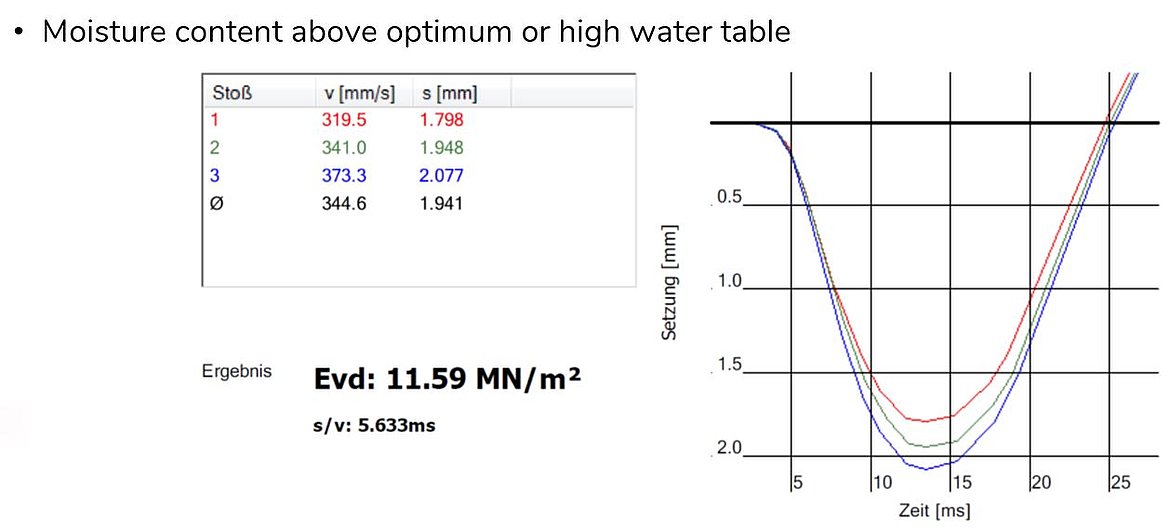
The water content of a soil layer influences its deformation behaviour.
Too much water can even make compaction impossible. This is often the case after heavy rainfall or when the groundwater level is high for some other reason.
The settlement values here increase significantly from impact to impact during a test with the Light Weight Deflectometer. Water may even leak out of the ground next to the load plate.
Work can only continue in this case when the water content has normalised. Time for a coffee break!
Click here to go back to the InfoCenter or to our products.